

Ford C-Max ECU Diagnosis in Walsall


A Ford C-Max came into us here at Platinum Vehicle Services with the owner concerned about warning lights showing on the dashboard and the engine not running as it should. The car was not in a state where it was undriveable, but something was clearly not right. The owner had noticed the engine felt hesitant under acceleration and the warning light had been on for a few days before they decided to bring it in. Rather than guess at the cause, we put it straight onto our diagnostic equipment to find out exactly what the vehicle was telling us.
The ECU Was Logging Faults That Pointed to a Communication Problem Between Engine Management Systems
When we connected our diagnostic scanner to the Ford C-Max, the ECU returned stored fault codes that pointed to a breakdown in communication between different control modules in the vehicle. The ECU, which stands for Engine Control Unit, is essentially the brain of the car. It monitors and controls a large number of functions at the same time, including fuel delivery, ignition timing, emissions systems, and how the engine responds to throttle input. When any of those systems report a value outside of the expected range, or when one module stops talking to another correctly, the ECU logs a fault code and triggers the warning light on the dashboard. In this case the codes were not random. They formed a pattern that told us where in the system the problem was sitting. Without the diagnostic equipment, you would have no way of knowing which of the dozens of possible faults was responsible. The scanner gives us actual data, not a rough idea.
Leaving Warning Lights Unread Means the Car Keeps Running Blind and Small Faults Develop Into Expensive Ones
A lot of people see a warning light and assume it is something minor or they decide to deal with it later. What most people do not realise is that when the ECU is logging faults, it can affect how the car manages fuel and engine timing in real time. The car may switch into what is called a limp or protection mode, where it deliberately restricts power to prevent further damage. If the root cause is left unaddressed, what might start as a wiring or sensor issue can place stress on other components that were working fine. A straightforward diagnosis job now is almost always cheaper than the repair job that follows if you drive the car for several more weeks without knowing what is wrong.
Full Diagnostic Scan Completed, Fault Codes Read and Recorded, and the Owner Given a Clear Picture of What Needs Attention
We carried out a full diagnostic scan of the vehicle, read and recorded all stored and pending fault codes from the ECU, and went through the findings with the owner in plain terms. We explained exactly which system was flagging the fault, what that system does, and what the recommended course of action was. The owner left knowing what was wrong rather than just knowing that something was wrong, which is the whole point of a proper diagnosis. We did not guess and we did not recommend unnecessary work. The findings led to a clear next step that the owner could make an informed decision about.
If your car has a warning light showing, or if it feels like it is not running the way it should, it is worth getting it looked at before it develops into something more involved. Common signs to watch for include hesitation when you pull away, a rough idle at standstill, unusual fuel consumption, or a dashboard warning light that stays on rather than clearing itself after a short period. These are all things the ECU may be logging even if the car still feels driveable. At Platinum Vehicle Services in Walsall, we use specialist diagnostic equipment to get to the actual cause of the fault rather than working on assumption. If your vehicle is showing any of these signs, get in touch with us and we will book you in for a proper diagnosis. You can find us at platinumvehicleservices.co.uk.
2017 Audi A4 Wheel Bearing and Anti Roll Bar Replacement in Walsall


A 2017 Audi A4 came into us here at Platinum Vehicle Services with the owner reporting a low rumbling noise that had been getting gradually worse over several weeks. There was also a slight pulling sensation through the steering on faster roads. Those two symptoms together pointed us in a fairly clear direction before we had even put the car on the ramp, but we always do a proper inspection before confirming anything, and in this case what we found gave us a complete picture of what needed doing.
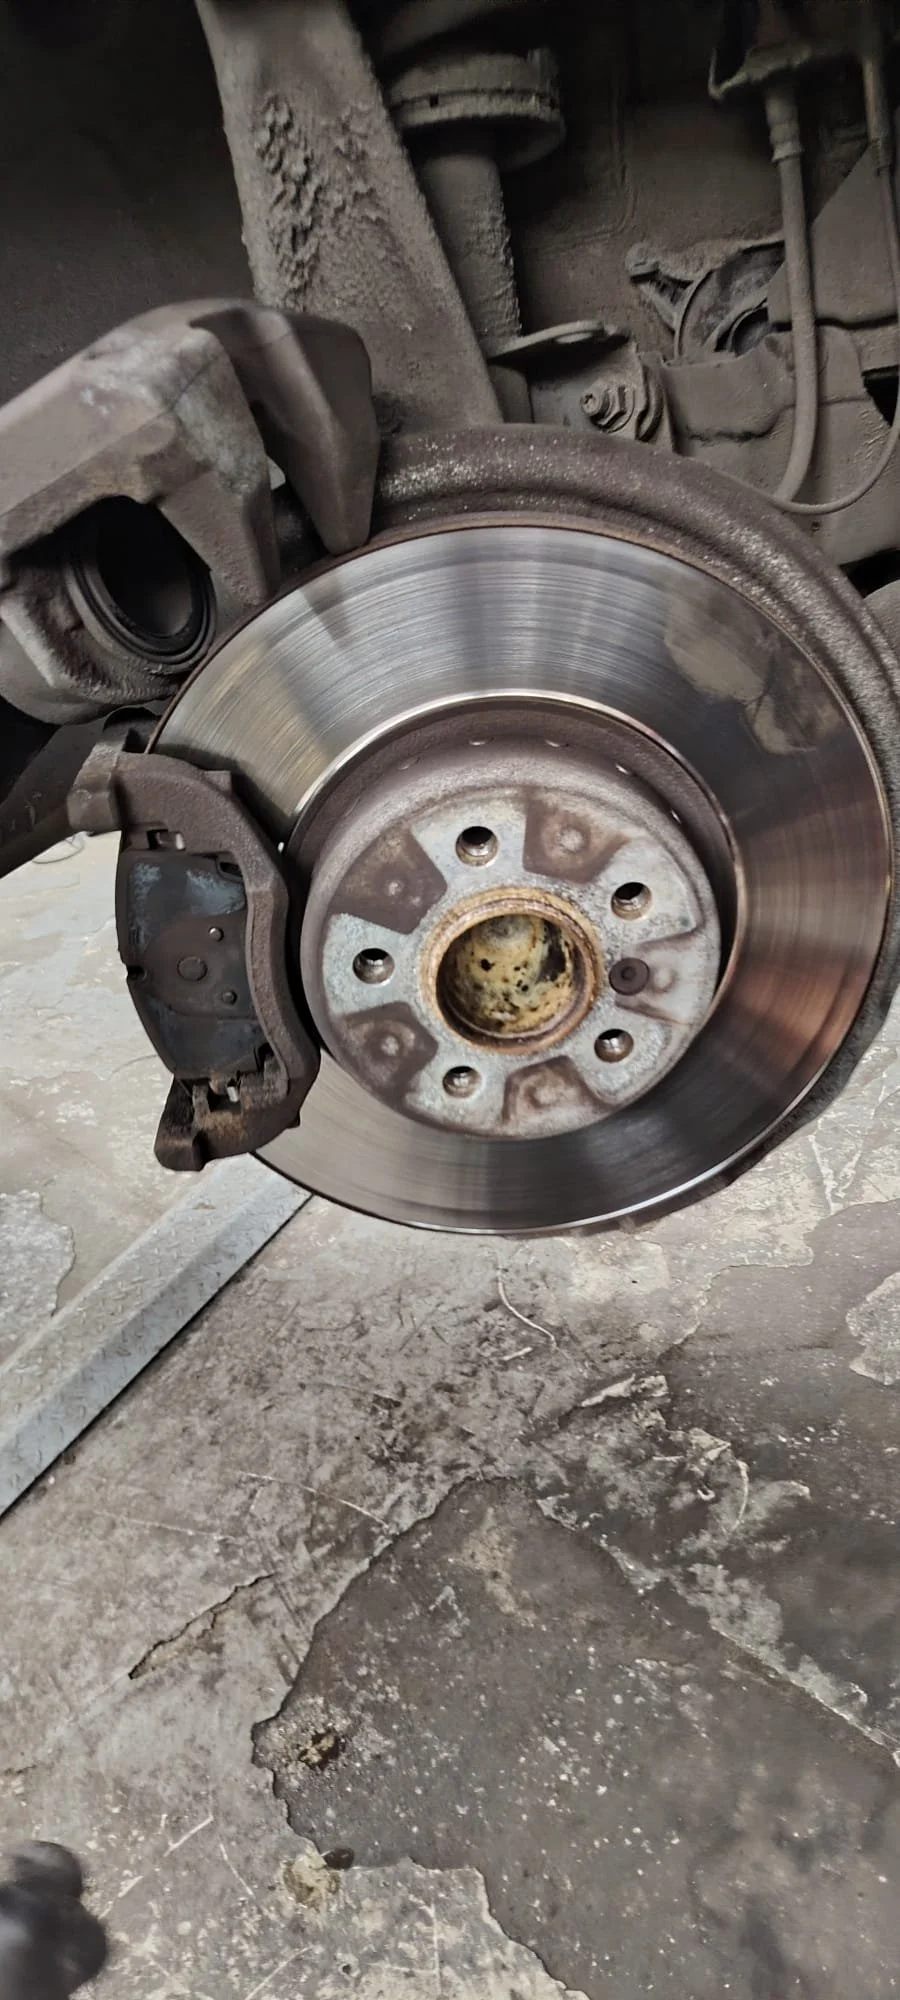
The Front Wheel Bearing Had Developed Significant Play and the Anti Roll Bar Drop Link Was Worn Through
Once the car was up on the ramp and the front wheel was off, we checked the hub assembly for play by gripping the wheel at the 12 o'clock and 6 o'clock positions and rocking it. There was noticeable movement, which tells you the bearing has lost its internal tolerance. A wheel bearing is designed to allow the wheel to spin freely while holding it firmly in place with no lateral or axial movement at all. When that movement starts to appear, the bearing is on its way out. On this A4, the play was enough that you could feel it clearly by hand, which means it had been deteriorating for some time. The rumbling noise the customer described is exactly what a failing bearing sounds like, caused by the rolling elements inside the bearing moving against worn or pitted raceways rather than running smoothly. While we had the front end stripped down we also inspected the anti roll bar drop links. The drop link is a short connecting rod that joins the anti roll bar to the suspension strut, and its job is to transfer load from one side of the car to the other when you go around a corner, keeping the body level and the tyres in proper contact with the road. On this car, the drop link bush was split and the joint itself had excessive free movement in it. That is what was contributing to the steering pull and the vague, slightly unsettled feel through the wheel.
Leaving Either of These Issues Any Longer Would Have Created a Real Safety Problem and a Much Larger Bill
A worn wheel bearing does not stay at the same level of wear. Once the internal play has developed to the point where it is detectable by hand, the rate at which it deteriorates tends to accelerate. The bearing generates heat as it runs in that worn state, and heat breaks down the grease inside the bearing and causes further damage to the raceways. In a worst case, a bearing that is left long enough can seize completely or shed its outer race. Either of those outcomes on a front wheel means you lose control of steering on that corner of the car. That is not a risk worth taking for the sake of getting the job done quickly. On the cost side, a bearing that is caught at this stage means you are replacing the bearing. A bearing that is left until it causes secondary damage can mean replacing the hub, the driveshaft, or in some cases components further up the suspension. The drop link is a less dramatic failure on its own, but a broken drop link means the anti roll bar is effectively disconnected on one side. The car will roll significantly more through corners, the tyre loading becomes uneven, and the handling becomes unpredictable at speed. Neither of these were something we were comfortable signing off without addressing.
New Wheel Bearing and Drop Link Fitted to the Front Axle and the Car Road Tested Before Being Returned
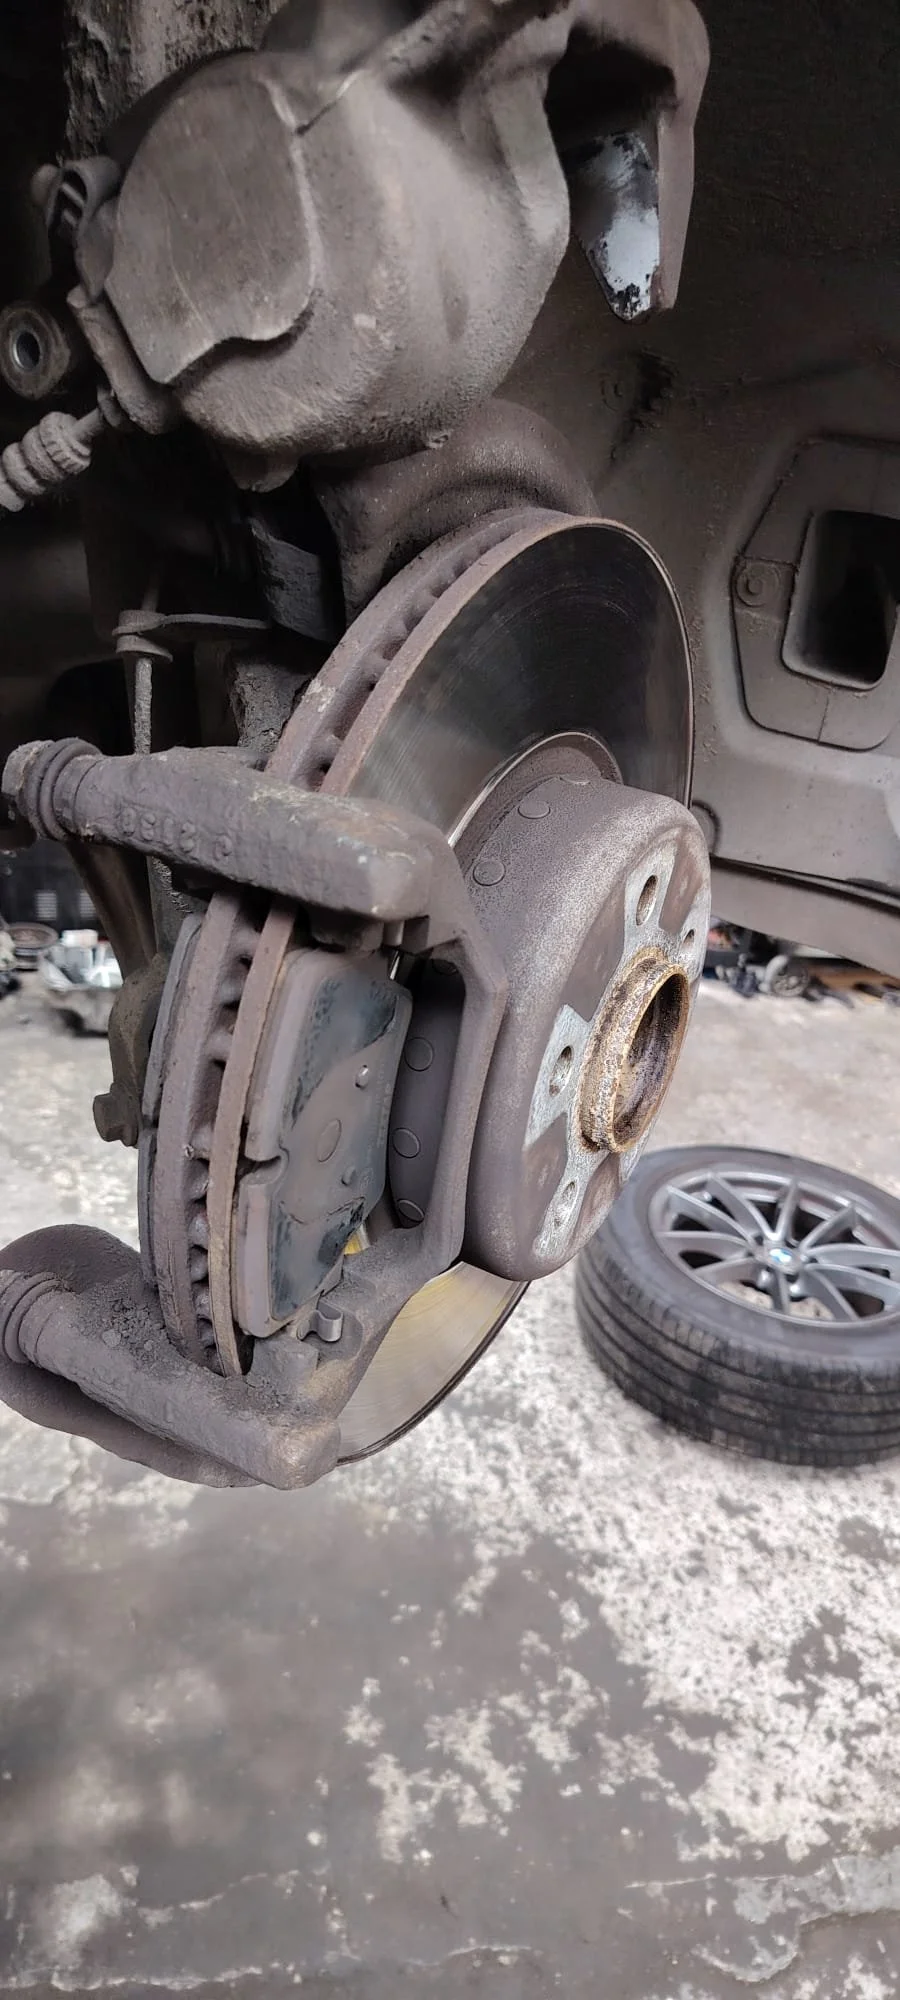
We pressed out the old bearing from the hub carrier using the correct press tooling, fitted a new bearing to the proper specification for a 2017 A4, and torqued everything back up to the manufacturer's settings. The drop link was replaced with a new unit, again to the correct specification, and the front end was reassembled. Once the car was back on the ground we took it out for a road test to confirm the rumble had gone and that the steering was tracking cleanly. It was. The car came back noticeably quieter and the steering felt settled and accurate again, which is exactly what it should feel like on an A4 of this age in otherwise good condition.
Suspension and bearing work is something we carry out regularly here at Platinum Vehicle Services in Walsall, across all makes and ages of vehicle. If you are driving something and you notice a low humming or rumbling noise that changes with your speed but not your engine revs, that is worth getting looked at. If the noise changes when you gently steer left or right at motorway speed, that points even more specifically to a wheel bearing. A knocking or clunking noise from the front end over bumps or when turning in a car park tends to suggest drop links, ball joints, or anti roll bar bushes. None of these things resolve themselves, and all of them affect how safely the car handles. If any of that sounds familiar, bring your car to us and we will put it on the ramp and tell you exactly what we are looking at. You can book in at platinumvehicleservices.co.uk.
Skoda Fabia Rear Subframe and Suspension Replacement in Walsall
The Subframe Was Being Replaced and the Shocks and Springs Were Worn Beyond What We Would Leave on Any Car
With the Fabia up on the hoist and the rear end fully accessible, we could see clearly that the shock absorbers and coil springs had worn beyond a reasonable point. The shocks were not providing the damping they should be. On a healthy shock absorber, the damper resists movement through the spring travel, keeping the wheel in contact with the road surface through corners and over uneven ground. When that resistance goes, the wheel bounces rather than tracks. The springs themselves were also showing their age, sitting lower than they should and lacking the tension needed to support the rear of the car properly. These are not cosmetic issues. They affect how the car behaves under braking, how it handles on bends, and how predictable it feels when you need to react quickly.
Leaving Worn Shocks and Springs in Place Would Have Put More Stress on the New Subframe and Created a Real Handling Risk
If we had fitted a new subframe and sent the car on its way with the old shocks and springs still on, those components would have continued to degrade. The knock-on effect is that a worn shock puts extra strain on the mountings around it, and a subframe that is constantly absorbing movement it should not have to deal with will not last as long as it ought to. Beyond the mechanical cost of getting to that point again, there is a straightforward safety issue here. A car with poor rear damping does not behave predictably under load. If you brake hard, the rear can feel unstable. If you go over a pothole or a ridge in the road, the wheel can skip rather than stay planted. At motorway speeds that matters considerably. Addressing everything at the same time, while the car is already apart, is the sensible and more cost-effective approach.
New Shock Absorbers and New Black Coil Springs Fitted to Both Rear Corners Alongside the Subframe
We fitted a full set of new rear shock absorbers along with new black coil springs to both corners. With the subframe already out, access to these components was clean and direct, which kept the additional labour time down compared to doing it as a standalone job. The new springs sit at the correct ride height and hold the correct tension. The new shocks will dampen movement properly through the spring travel, keeping the rear wheels in consistent contact with the road. The car was also checked over thoroughly while it was in the air, because that is just how we work. When you have a car fully elevated and the underside visible, you look at what is there. If something else needs attention, we tell you. We do not flag things unnecessarily, but we do not ignore things either.
If Your Car Feels Unsettled at the Rear, It Is Worth Getting It Looked At Before It Becomes a Bigger Job
Rear suspension wear tends to creep up on you. Because it happens gradually, many drivers do not notice until the car feels noticeably different from how it used to. Signs to watch for include a bouncy or floaty feeling over speed bumps that does not settle quickly, a clunking noise from the rear when going over uneven road surfaces, the back of the car sitting lower on one side than the other, or a feeling of instability when braking at speed. If any of those sound familiar on your car, it is worth getting it looked at sooner rather than later. The longer worn suspension components are left, the more stress is placed on the surrounding parts, including bushes, mountings, and in some cases the subframe itself. We carry out suspension inspections and repairs regularly here in Walsall, and we will always give you a clear picture of what is going on before any work is agreed. If you want to book your vehicle in, you can reach us at platinumvehicleservices.co.uk.
Ford Fiesta Worn Ball Joint Diagnosed and Inspected at Our Walsall Garage
A blue Ford Fiesta came into us here at Platinum Vehicle Services after the owner noticed the car had not been feeling quite right through the front end. There was no dramatic single event that prompted it, just a gradual sense that the steering was not as precise as it used to be and an occasional knock that had been getting a little more noticeable over time. We put it straight up on the lift and started working through the front suspension to find out what was going on.
The Lower Control Arm Ball Joint Had Excessive Side to Side Play and Was Clearly Past the Point of Acceptable Wear
With the vehicle raised, we went through the front suspension methodically. When we got to the lower control arm ball joint on the front, the problem was obvious. A ball joint is the pivot point that connects the lower control arm to the steering knuckle. It allows the wheel to move up and down with the road surface while also turning left and right when you steer. It needs to be tight. When we gripped the joint and applied lateral pressure, there was clear, visible side-to-side movement that should not have been there. A healthy ball joint has essentially no free play at all. What we were seeing on this Fiesta was a joint that had worn through its housing and was moving independently of where it should be sitting. That is not a grey area. It is a failed component.
Leaving a Worn Ball Joint on the Road Means the Wheel Can Move in Ways the Driver Cannot Predict or Control
It is worth being clear about what a ball joint actually does when it fails completely, because this is not just a comfort issue. The ball joint is what keeps the wheel correctly located under the car. If that joint lets go while the vehicle is moving, the wheel can collapse outward or inward depending on the forces acting on it at that moment. At low speed in a car park, that could mean loss of steering control. At higher speeds on a dual carriageway, the consequences are significantly more serious. Short of a catastrophic failure, the deterioration in handling is also progressive. The excessive play we found means the wheel is not sitting at a consistent geometry. The steering will pull, the car will feel vague, and the driver is working harder than they should be just to hold a straight line. Tyre wear also becomes uneven because the contact patch is not staying where it should be. A tyre that wears unevenly costs you money at the next replacement and can develop irregular wear patterns that reduce grip. The longer a worn ball joint is left, the more it tends to damage surrounding components as well, including the control arm bushes and the steering knuckle itself, which pushes the repair cost upward.
The Ball Joint Was Identified for Replacement and the Full Front Suspension Checked as Part of the Inspection
We documented what we found and presented it clearly to the owner so they could see exactly what we were looking at. The excessive play in the lower control arm ball joint was the primary finding, and replacement was the only appropriate course of action. As part of the inspection process, we also worked through the rest of the front suspension to make sure nothing else had been affected by the additional stress that a worn joint puts on surrounding components. Catching problems at this stage, before a joint fails entirely, is the difference between a manageable repair and a much more involved job.
If your car has been pulling to one side, producing a knock or clunk through the front end, or just not feeling as settled through corners as it used to, those are the signs that something in the suspension or steering is worth looking at. It does not always mean the ball joint specifically, but the front suspension is the right place to start. We see these faults regularly at our garage in Walsall, and in most cases, the sooner the vehicle comes in, the simpler and less expensive the repair turns out to be. If any of that sounds familiar, get in touch with us or book online at platinumvehicleservices.co.uk and we will take a proper look.
Nissan Juke DPF Regeneration in Walsall
We had a silver Nissan Juke come into the workshop recently with the DPF warning light showing on the dash. The owner told us the car had been feeling sluggish and the light had been on for a few days. They were not sure what it meant, but they knew something was not right. We put it on our Snap-on Modis Edge diagnostic machine and confirmed what we suspected straight away. The diesel particulate filter was heavily loaded with soot and needed a forced regeneration carried out here in the workshop.
The DPF Soot Content Was High Enough to Prevent the Car from Regenerating on Its Own
The diesel particulate filter on this Juke works by trapping soot particles from the exhaust gases before they leave the tailpipe. Under normal driving conditions, the car will attempt to burn that soot off by itself during what is called a passive regeneration. This happens automatically when the exhaust temperature gets high enough, usually on a longer motorway run. The problem with a car that is mostly used for short trips around town is that the exhaust never gets hot enough for long enough to complete that process. Soot builds up gradually, and eventually the filter reaches a point where it cannot clean itself. On our diagnostic screen, the Modis Edge was showing us the real-time soot content inside the filter. When we connected it, the reading was high enough that the car's own system had already given up trying to regenerate. At that point, the only way to resolve it is a forced regeneration carried out by a technician using professional equipment.
Leaving a Blocked DPF Any Longer Risks Permanent Filter Damage and a Repair Bill Running into the Hundreds
This is worth understanding properly, because a lot of drivers see the DPF light, notice the car is still driving, and decide to leave it. That is when the situation gets expensive. A DPF that is sat at a high soot loading and not being addressed will eventually reach what is known as ash accumulation, where the blocked material can no longer be burned off at all. At that stage, a forced regeneration will not fix it. The filter itself needs replacing, and on a Nissan Juke that can cost anywhere from around 600 to over 1,000 pounds depending on whether you are looking at a genuine part or a quality aftermarket unit, plus the labour on top. There is also the risk of the engine going into a protective limp mode, where it cuts power to prevent further damage. When that happens, the car becomes unreliable to drive and potentially unsafe if it happens at the wrong moment. The earlier a blocked DPF is dealt with, the more options you have and the less it costs.
A Full Forced Regeneration Carried Out Using the Snap-on Modis Edge, with the Process Monitored Throughout Until Soot Content Returned to a Safe Level
To carry out the regeneration, we connected the Snap-on Modis Edge to the Juke's diagnostic port and initiated a forced regeneration cycle through the software. The machine controls the process and monitors the key parameters throughout, including the exhaust temperature before and after the filter, and the DPF soot content in real time. During regeneration the engine revs itself up and the exhaust temperature climbs significantly, often to over 600 degrees Celsius at the filter itself, because that is the temperature needed to burn the accumulated soot. We keep the car running on the ramp for the full duration, which in this case was around thirty minutes. The technician checked on the readings throughout and confirmed the soot content was dropping steadily. By the end of the cycle, the filter was reading clean and the warning light was off. The car left the workshop running smoothly with no warning lights showing and no sluggishness in the throttle response.
If Your Diesel Car Is Showing Warning Lights or Feels Heavy to Drive, Do Not Leave It
DPF problems are one of the most common issues we deal with on modern diesel vehicles, particularly those that spend most of their time on shorter journeys. If you drive a diesel and you are seeing a DPF warning light, a loss of power, increased fuel consumption, or white or grey smoke from the exhaust, those are all signs the filter may be loading up with soot. The earlier you bring it in, the more likely it is that a forced regeneration will resolve the problem completely without any need for parts. We carry out DPF diagnostics and regenerations regularly here in Walsall, and we use the same Snap-on Modis Edge equipment you can see in the video to monitor the process properly from start to finish. If you are unsure whether your diesel car is dealing with a DPF issue, bring it in and we will have a look. You can book in at platinumvehicleservices.co.uk.
2018 Mercedes A-Class Full Service Completed With No Issues in Walsall
A 2018 Mercedes A-Class came into us here at Platinum Vehicle Services for a full service. The car is a white A-Class on a 68 plate, and the owner wanted everything gone through properly rather than just a quick top-up and send-off. That is exactly how we approach a full service. The car went straight up on the lift so we could work through the whole vehicle methodically, starting underneath with the oil and filter.
The Oil Draining Out Was Dark and Degraded, Which Is Exactly What You Would Expect at This Service Interval
When we pulled the sump plug and let the old engine oil drain into the collection pan, what came out was dark and well used. That is not a problem in itself. It tells you the oil has been doing its job, collecting combustion by-products, metal particles from normal engine wear, and moisture that builds up inside the engine over time. Engine oil on a Mercedes M270 petrol engine like this one is not meant to stay golden and clean forever. It degrades as it works. What matters is that it gets changed before it stops doing its job properly.
On a full service, we also pull the oil filter housing and replace the filter cartridge inside it. The housing on this engine sits accessibly under the car, which made the job clean and easy to carry out. A blocked or saturated filter stops the oil circulating freely around the engine, and that is where problems start to develop.
Old Engine Oil Left Too Long Loses Its Ability to Lubricate and Can Cause Wear to Internal Components That Is Expensive to Put Right
Engine oil has a finite life. As it breaks down, it loses its ability to maintain a proper film between moving metal parts inside the engine. The crankshaft, camshafts, and valve train components all depend on that film being there at all times. When it is not, metal contacts metal, and that wear is cumulative. It does not reverse itself. On a petrol engine like this one, the cost of addressing worn internals caused by neglected oil changes is significantly higher than the cost of the service itself. A full engine rebuild on an A-Class can run into several thousand pounds. A full service is a fraction of that.
There were no warning lights on this car and no issues reported by the owner before it came in. The oil change was overdue by service interval rather than by any obvious symptom, which is often how it goes. Engines do not always give you clear warning signs before they start to suffer. Keeping on top of the manufacturer's service schedule is the point of having it done regularly.
Fresh Oil and a New Filter Fitted, All Levels and Components Checked Across the Car, and No Issues Found
Once the old oil had fully drained, the new filter cartridge was fitted and the housing torqued back up to the correct specification. We then refilled the engine with fresh oil to the grade Mercedes specify for the M270 unit, which is a fully synthetic low-viscosity oil. We ran the engine to circulate the new oil, checked for leaks at the sump plug and filter housing, and confirmed the oil level was sitting correctly before switching off.
From there we worked through the rest of the full service inspection. Brake pad thickness was measured front and rear to confirm there was sufficient material remaining. The tyres were checked for wear across the tread and pressures were set correctly. Coolant level, brake fluid level, and the condition of the air filter were all assessed. Everything came back in good order. There was nothing on this car that needed flagging to the owner, and it left us in solid condition with the service complete and a full record of the work carried out.
If your car is coming up for a service and you are based in or around Walsall, we carry out full services, interim services, and manufacturer-scheduled servicing here at Platinum Vehicle Services. A full service always includes the oil and filter change, but it goes considerably further than that. We check brake components, steering, suspension, tyres, fluid levels, lights, and the general condition of the vehicle so that you know exactly where things stand when you drive away.
One thing worth keeping an eye on with your own car is the service interval light or the mileage since the last oil change. If you are not sure when it was last done, that is usually a sign it has been a while. Dark oil on the dipstick is perfectly normal, but oil that smells burnt or has become very thick in consistency is worth getting looked at without delay. Any light ticking or knocking from the engine on a cold start is also a reason to book in rather than leave it and see what happens.
We are based in Walsall and take bookings for servicing, repairs, and inspections throughout the week. You can find out more or book your car in at platinumvehicleservices.co.uk.
Nissan X-Trail MOT Inspection in Walsall Passes With No Issues Found
A black Nissan X-Trail came into us at Platinum Vehicle Services for its MOT. The owner had kept on top of the car and wanted it checked over properly before the certificate was due. We put it through the full inspection process, and as part of that we gave the rear right wheel a thorough going-over — tyres, brakes, wheel bearing, shock absorber, and suspension spring. It is worth walking through what we looked at and what we found, because it gives a good picture of what a proper MOT inspection actually involves on this type of vehicle.
The Rear Tyre, Brake Disc, Pads, and Wheel Bearing Were Each Checked Individually and in Full
We started at the tyre. The tread depth was well within legal limits and the sidewalls were in good condition on both the outer and inner faces, with no cracking, bulging, or cuts. The minimum legal tread depth is 1.6mm across the central three-quarters of the tyre, and this one had a good amount of depth remaining across that full width. Once the tyre was cleared, we moved on to the brake disc and pads. The disc showed the kind of light surface wear you would expect on a car of this age and mileage, but there was no deep grooving, no lipping around the edge significant enough to cause concern, and no sign of cracking. The pads had material remaining and were not at the point of needing attention. We then spun the wheel by hand to check the bearing. We were listening and feeling for any roughness, grinding, or looseness in the rotation. There was none. The bearing felt tight and the wheel spun cleanly with no play when we checked it side to side and top to bottom.
The Shock Absorber Was Completely Dry and the Suspension Spring Was Intact With No Rust or Fractures
With the wheel checked, we moved under the vehicle to look at the rear suspension. The shock absorber was the first item. We were checking for oil weeping from the top of the unit or around the seal, which is one of the most common failure points on a shock absorber at this age. A leaking shock absorber does not just fail the MOT. It reduces the car's ability to keep the tyres in contact with the road surface, which becomes a real problem when you need to brake sharply or when the road surface is uneven. This one was dry throughout. No leaks, no staining, no sign of seepage. The suspension spring was also in good shape. We looked for corrosion and for any fractures along the coils. A broken spring can drop without much warning and in the worst case can puncture the tyre from the inside, so it is something we take seriously. This spring had no visible rust of concern and no breaks at any point along its length.
The X-Trail Passed Its MOT With No Advisories Raised on the Rear End or Elsewhere
The result was a clean pass. Nothing was flagged, nothing was noted as an advisory, and the owner drove away with a full MOT certificate. That outcome reflects how well the vehicle had been looked after going in. The tyres had clearly been checked and maintained, the brakes had not been left to wear down, and the suspension components were in the condition you would hope to see. It does not happen automatically. It happens because the owner had paid attention to the car.
If your own car is due for an MOT, or if you are noticing anything that concerns you before the test date arrives, there are a few things worth being aware of. If your tyres feel different from usual when braking or cornering, get the tread and pressures checked before the test. If you can hear any grinding or scraping from behind a wheel when you are moving, that could indicate a brake or bearing issue that will not resolve itself. If the car feels softer over bumps than it used to, or if you notice oil staining on the inside of a wheel, it is worth having the shock absorbers looked at before you book the MOT itself, because a failed test costs you another test fee on top of the repair.
We carry out MOT testing and vehicle inspections here in Walsall and we are happy to give your car a look before the test date if you want to know where you stand. You can book in with us at platinumvehicleservices.co.uk.
2013 Vauxhall Corsa Misfire Diagnosis in Walsall: Why We Stopped Before Replacing the Spark Plugs
This 2013 Vauxhall Corsa came into us at Platinum Vehicle Services with a misfire. The customer had been told, or at least suspected, that spark plugs were the likely cause. That is a fair assumption in most cases. A misfire on a Corsa of this age can absolutely come down to worn plugs, and a set of new ones usually sorts it. But before we start replacing parts, we always take the time to look at what is actually in front of us. In this case, what we found changed the direction of the job entirely.
Water Was Pooling Around One of the Spark Plugs and the Coolant Reservoir Was Full of Oil
When we pulled the spark plug cover and got eyes on the plugs, one cylinder had water sitting around it. That is not normal. Water in that area suggests it is getting in from somewhere it should not be, and on a petrol engine like this, the most common route is through a failed head gasket. We did not stop there. We went to check the coolant reservoir, and the customer mentioned something that immediately made us take this more seriously: they said the coolant had been clean just a week before.
When we removed the yellow reservoir cap, the inside of it was coated in a thick, dark, oil-contaminated sludge. The fluid in the reservoir was visibly contaminated too. Oil and coolant are two systems that are kept entirely separate inside the engine. They have their own channels, their own seals, and their own jobs to do. When you see oil in the coolant, it means those two systems are no longer separated. The head gasket sits between the engine block and the cylinder head, and it is what keeps oil, coolant, and combustion gases in their correct channels. When that gasket fails, the seals break down and the fluids mix. That is what we were looking at here.
Fitting New Spark Plugs at This Point Would Have Cost the Customer Money Without Fixing Anything
If we had gone ahead and fitted a new set of spark plugs without investigating further, the misfire would not have gone away. The water getting into that cylinder is what is causing the engine to run rough. New plugs would have been fouled again quickly, or the misfire would have continued regardless. The customer would have paid for parts and labour that did not address the actual problem, and then come back to us a short time later in a worse situation.
A blown head gasket left unaddressed does not stay at the same level. Once oil and coolant are mixing, the coolant loses its ability to keep the engine at the right temperature. The oil also becomes contaminated and loses its viscosity, which means it does not lubricate the engine components properly. Over time, this leads to overheating, and overheating on a petrol engine can warp the cylinder head. A warped head means the head gasket repair also requires the head to be skimmed or replaced, which adds significant cost on top of the gasket work itself. If the engine is run long enough in this condition, you can reach a point where the engine block itself is damaged, and at that stage the repair bill can exceed the value of the car.
We advised the customer on all of this before any further work was carried out. The decision on how to proceed was theirs to make with a full picture of what was going on.
The Plugs Were Left in Place and the Customer Was Given an Accurate Diagnosis to Work From
Rather than fitting plugs the car did not need at that point, we documented what we found, explained the head gasket situation clearly, and gave the customer the information they needed to decide on the next step. The correct repair here is a head gasket replacement, which involves removing the cylinder head, inspecting it for warping, replacing the gasket, and refitting everything with new head bolts and correct torque settings. The coolant system would also need to be fully flushed to remove the oil contamination before clean coolant goes back in.
This is a significant job, but it is a manageable one when it is caught at the right time. The customer came to us thinking they needed spark plugs. What they actually needed was an accurate diagnosis, and that is what we gave them.
If you drive a Vauxhall Corsa, or any petrol car of a similar age, there are a few things worth keeping an eye on. Check your coolant reservoir regularly. It should be clear or slightly tinted depending on the coolant type, never brown or sludgy. If you see a creamy or oily residue on the underside of your oil filler cap, that is another indicator that oil and coolant may be mixing. A persistent misfire that does not respond to basic maintenance, a sweet smell from the engine bay, or your temperature gauge running higher than usual are all signs worth getting looked at before they develop further.
We carry out engine diagnostics and fault investigations at our garage in Walsall, and we do not quote for work until we know what the car actually needs. If your car is misfiring, running hot, or you have noticed anything unusual with your coolant or oil, get it booked in with us before the problem has a chance to become a more expensive one. You can reach us and book an appointment at platinumvehicleservices.co.uk.
Broken Coil Spring and Worn Strut Mount Found on a 2019 Nissan Qashqai in Walsall
A 2019 Nissan Qashqai came into us here at Platinum Vehicle Services with a knocking noise that the owner had been noticing particularly when turning. It was not a violent clunk, more of a persistent knock that had been building over time. That kind of noise on a Qashqai of this age is something we take seriously from the moment it rolls through the door, because the front suspension on these cars takes a considerable amount of load, and when something lets go in that area, it can affect more than just comfort.
The Coil Spring Was Broken and Rubbing Directly Against the Chassis
With the car raised on the ramp and the front left corner accessible for a proper look, the cause of the knocking was not difficult to find. The coil spring on the front left strut had cracked and broken through. A section of the spring had separated and was sitting loose within the spring perch, and as the suspension moved through its travel, that broken segment was making contact with the chassis. You could see the rubbing marks on the bodywork where it had been catching. On top of that, the strut mount at the top of the assembly was showing excessive movement. When we manipulated the suspension by hand, the mount was moving in a way it should not be, which is what mechanics refer to as it dancing. A healthy strut mount holds firm and allows controlled rotation of the strut. When it is worn to this degree, it cannot do either of those things properly.
A Broken Spring Is Not Something You Can Leave and Monitor
I want to be clear about why this matters beyond the noise. A coil spring is doing a very specific job. It is carrying the weight of that corner of the car and absorbing the energy from the road surface. When it breaks, that corner loses its proper support, and the geometry of the suspension changes. The car will not sit level, steering response becomes unpredictable, and if the broken fragment moves further, it can contact a tyre. A piece of steel spring pressing against a rotating tyre can cause a blowout, and at motorway speeds that is a serious situation. The worn strut mount compounds the problem because it is no longer holding the top of the strut in the correct position. Between the two faults, the suspension on this corner was not functioning as designed, and the longer it runs that way, the more secondary damage builds up in connected components such as the lower arm bushes and the wheel bearing, both of which take on additional stress when the geometry is out.
The Spring and Strut Mount Are Being Replaced and the Shock Absorber Assessed Once the Assembly Is Stripped
The repair plan for this Qashqai involves removing the full front left strut assembly, which means the spring, the strut mount, and the shock absorber all come out together. Once we have it on the bench stripped down, we can assess the shock absorber properly. From the outside it showed no obvious leaking, but a shock absorber that has been working alongside a broken spring and a worn mount will often have taken damage that is not visible until you have it apart. Replacing the spring with a worn shock absorber underneath it is a false economy, so we will make that call once we can see it properly. The strut mount is being replaced as part of the job regardless.
If you own a Nissan Qashqai, a Juke, a Ford Focus, a Vauxhall Astra, or any car with MacPherson strut front suspension, the things worth listening for are any knocking or clunking when going over speed bumps or turning on full lock, a pulling sensation to one side, or a car that sits noticeably lower on one corner. None of those things resolve themselves. We cover suspension inspections and repairs for all makes and models here in Walsall, and catching a broken spring before it damages a tyre or causes further wear to the surrounding components is always going to be less expensive than dealing with those consequences. If your car is making a noise you cannot explain or you have not had the suspension looked at in a few years, book in with us at platinumvehicleservices.co.uk and we will get it on the ramp and tell you exactly what we find.
Range Rover MOT Inspection in Walsall
A black Range Rover came into us here at Platinum Vehicle Services in Walsall for its annual MOT. The owner had kept it in good general condition, but as with any vehicle of this size and weight, there are specific areas that take more punishment than others and that we always pay close attention to during a test. Range Rovers are well-built cars, but they are heavy, they sit high, and the components that manage all of that weight work harder than they would on a lighter vehicle. That means the inspection needs to be thorough, not just a pass or fail on the obvious items.

The Suspension and Steering Components Showed Wear That Would Have Worsened Quickly Without Attention
When we put the Range Rover over the ramp and worked through the suspension and steering checks, we found play in one of the front track rod ends. The movement was not excessive, but it was beyond what is acceptable for a pass and, more importantly, beyond what you want on a vehicle that weighs over two tonnes. A worn track rod end affects your steering precision. At low speed you might not notice much, but at motorway speeds or during an emergency manoeuvre, that small amount of slack becomes a real problem because the wheel is not responding to exactly what you are asking it to do. Left unaddressed, the component can deteriorate further and eventually fail altogether, at which point you lose steering control. The cost of replacing a track rod end on its own is manageable. The cost of ignoring it until the joint fails, and the consequential damage that follows, is considerably higher. We also checked the air suspension system, which is standard on this model, and confirmed the ride height and pressure were sitting within the correct range, so no work was needed there.
The Brake Pads Were Still Within Tolerance but Only Just, and We Made Sure the Customer Knew Before Leaving
The front brake pads measured 4mm of friction material remaining. That is above the legal minimum, so it did not affect the MOT result, but it is worth understanding what that number means in practice. New pads typically start at around 10 to 12mm. By the time you reach 3mm you are approaching the point where the wear indicator will start making contact with the disc and you will begin to hear a high-pitched scraping sound when you brake. At 2mm the metal backing plate can begin to score the disc surface. Once that happens you are no longer just replacing pads, you are replacing discs as well, and on a Range Rover of this size and specification, that is a significantly more expensive job. We advised the owner that the pads would need attention within the next few thousand miles and booked them in for a follow-up check. The rear brakes were in better condition at around 6mm, so those have more life left in them.
The MOT Was Completed and the Vehicle Passed, With a Clear Record of Everything Checked
Once the track rod end was replaced and torqued to the manufacturer's specification, we completed the full MOT inspection across all the required categories. That includes lighting, tyres, bodywork, exhaust emissions, wipers, horn, mirrors, and all of the safety-critical systems. The Range Rover passed without any additional advisories beyond the brake pad note we had already discussed with the customer. The tyres were sitting at around 5mm of tread depth across all four corners, which is well above the 1.6mm legal limit, and the condition of the tread was even, suggesting the geometry is set correctly. The emissions reading came back clean, which is what you want to see from a well-maintained engine.
If your vehicle is coming up for its MOT, or if you have noticed anything in your steering or braking that does not feel quite right, it is worth getting it looked at sooner rather than later. On heavier vehicles in particular, things like steering wander, a pulling sensation when you brake, or a vibration through the wheel at speed can all be early signs that something needs attention. We carry out MOT testing and vehicle inspections here in Walsall and we work on all makes and models, from small hatchbacks through to large SUVs like this Range Rover. You can book your MOT or arrange an inspection by visiting platinumvehicleservices.co.uk.
Audi A1 Mini Service Uncovers Worn Brake Pads and Discs in Walsall
This Audi A1 came into us at Platinum Vehicle Services booked in for a routine mini service. Nothing dramatic on the surface. The owner had noticed no major warning signs, which is actually quite common with brake wear. You do not always feel or hear the problem until it has gone well beyond the point where it should have been caught. We removed the front wheels as part of our standard service checks, and what we found under there needed addressing before that car went back on the road.
The Front Brake Pads Had Worn Down to the Metal and the Discs Had a Visible Wear Lip Along the Outer Edge
When we pulled the front wheel off, the state of the braking system was clear. The brake pads had reached the absolute end of their usable life. There was no friction material left to speak of. At that stage the metal backing plate of the pad is making contact with the disc, which is not something you want happening at any speed. A healthy brake pad has somewhere between 10mm and 12mm of friction material when new. By the time you are at 3mm you are in the advisory zone. These pads were past that point entirely. On top of that, the brake discs themselves had developed a pronounced lip along the outer edge. That lip forms when the centre of the disc wears down through regular use but the very outer edge, which sits beyond the reach of the pad, stays at its original height. When that lip becomes visible and measurable, it tells you the disc has lost enough material across its face that it can no longer do its job properly. A disc that is worn like this has less thermal mass, meaning it absorbs and disperses heat less effectively during braking. It also has an uneven surface that prevents the pad from biting evenly and cleanly.
Leaving the Brakes in This Condition Would Have Increased Stopping Distances and Put Real Pressure on the Rest of the System
I want to be direct about what the risk is here rather than just saying it was urgent. When pads are worn to the metal and pressing against a worn disc, your braking efficiency drops significantly. Stopping distances increase, and they increase more sharply the harder you have to brake. At 30mph in normal conditions a well-maintained car should stop in around nine metres. Once the system is compromised like this, that figure goes up and you lose the predictability you rely on. There is also the question of cost. Once metal is running against metal on a worn disc, the disc surface scores and gouges quickly. In some cases that process takes only a few hundred miles. What might have been a pad and disc replacement becomes a more involved job if other components are dragged into the damage. Leaving it longer was not an option.
New Brake Pads and Discs Were Fitted to Both Front Corners and the Full Mini Service Was Completed
We replaced both front brake discs and both sets of front brake pads. When we do this job we always replace both sides together. Fitting new components to one side and leaving worn ones on the other creates an imbalance. When you press the brake pedal, the car pulls toward whichever side has more grip, and that is not something you want to find out about for the first time in a hurry. The new discs were bedded in correctly and the pads seated properly before the car left us. The rest of the mini service was also completed, covering the oil, filter, and all the checks that come with that job. The car left us in a condition we were confident about.
If Your Brakes Feel Soft, Pull to One Side, or You Can Hear Grinding When You Stop, Book in Before It Gets Worse
Brake wear is something a lot of drivers do not notice until it has gone too far. The signs to listen and feel for are a grinding or scraping noise when you brake, a pulling sensation where the car drifts left or right as you slow down, a spongy feeling through the brake pedal, or a longer distance than usual before the car comes to a stop. If any of those sound familiar, do not leave it. At Platinum Vehicle Services in Walsall we carry out brake inspections as part of our servicing work and we will always tell you exactly what we find, including the measurements, so you understand what you are dealing with. You can book your vehicle in with us at platinumvehicleservices.co.uk.
BMW 5 Series Brake Service in Walsall, Worn Discs, Tired Calipers, and a Full Brake Overhaul
This BMW 5 Series came into us at Platinum Vehicle Services needing a brake service. The customer had noticed the car was not pulling up as cleanly as it should and had a slight judder through the brake pedal under firmer stops. That kind of feedback through the pedal is always worth taking seriously on a car this size. A 5 Series is a heavy vehicle and it asks a lot of its braking system, so we got it up on the ramp and took a proper look at what was going on.
The Discs Were Worn Below Minimum Thickness and the Calipers Were Showing Clear Signs of Deterioration


When we pulled the wheels off and inspected the brake assembly, the discs had worn down and were showing a pronounced lip around the outer edge. On a BMW 5 Series the rear discs should typically measure no less than around 10mm in usable thickness once you account for the minimum wear specification. These were past that point, and you could see corrosion cutting into the surface of the disc face itself, not just around the hat section where surface rust is normal, but across the braking track where the pads make contact. That means the friction surface is compromised and the pad cannot bite consistently across the full sweep of the disc. The calipers were also in poor condition. The slider pins had seized, which meant the caliper was not floating correctly. When a caliper cannot slide freely, the pad on one side carries almost all the load. That causes uneven wear, pulls the car to one side under braking, and puts the remaining pad material under far more stress than it is designed to handle.
Leaving This Any Longer Would Have Risked Uneven Braking, Accelerated Wear, and a Much More Expensive Repair
The judder the customer felt was a direct result of the disc surface being inconsistent. As the worn and corroded disc rotates, the pad is effectively hitting a surface that is no longer flat and even. That vibration travels back through the caliper, through the brake line, and into the pedal. Left alone, this does not stay the same. It gets worse, and it gets worse quickly. Seized caliper sliders, if not addressed, can cause the caliper to stick. A sticking caliper means one side of the brakes is working when the other is not, and under an emergency stop that is a serious problem because the car will not stop in a straight line. Beyond the safety concern, a seized caliper will destroy a new disc and pad set in a very short distance if the underlying problem is not fixed first. That would mean spending twice on parts and labour that should only need to be spent once.
New Discs and Calipers Fitted, Pads Replaced, and the Full Brake System Checked Before the Car Left the Workshop
We fitted new brake discs and replaced the calipers with quality replacements suited to the vehicle. New brake pads were fitted at the same time. There is no point fitting new discs and leaving old pads in place, because worn pads will score a new disc surface within the first few hundred miles. Once the new components were on, we bedded the brakes in correctly and checked the pedal feel before returning the car to the customer. The difference was immediate. A firm, progressive pedal with no judder and braking that felt consistent from the start of the stop to the end of it.
Brake work is one of the most common jobs we carry out here in Walsall, and the BMW 5 Series is a car we see regularly. If you are driving a 5 Series or any other BMW and you have noticed a judder through the pedal, a pulling sensation when you brake, a grinding noise, or a soft pedal that requires more pressure than usual, those are the signs worth acting on before a straightforward service turns into a larger job. Any spongy or inconsistent pedal feel is worth having checked. Corrosion on discs that looks like a thin layer of surface rust after the car has sat overnight is normal and clears itself after a few stops, but deep pitting or a visible lip at the edge of the disc means the disc is past its serviceable life. We offer brake inspections and full brake servicing for all makes and models, and we will always tell you what we find and what actually needs doing rather than adding work that is not necessary. If your car is due a brake check, get in touch with us at Platinum Vehicle Services in Walsall and we will take a look. You can book online or find out more at platinumvehicleservices.co.uk.
2019 BMW 520d M Sport Brake Disc and Pad Replacement in Walsall
A 2019 BMW 520d M Sport came into us here at Platinum Vehicle Services needing a brake pad replacement. The customer had noticed the brakes were getting to the point where they needed attention, and they were right to bring it in when they did. What we found during the inspection told us the job was going to be a bit more involved than a straightforward pad swap.
The Discs Had a Noticeable Lip and the Pads Were Worn Well Past a Safe Level
When we got the wheels off and had a proper look at the brake components, the first thing that stood out was the condition of the discs. There was a clearly visible lip around the outer edge of the disc face. That lip forms over time as the pad wears away the central contact area of the disc, leaving a raised ridge at the edge where the pad never reaches. On this car, the lip was significant enough that it told us the discs had been working hard for some time and had thinned down considerably from their original thickness. The pads themselves were also worn down to a level that left very little material remaining. BMW M Sport models like this one tend to be driven with a bit more confidence on the road, and the braking system reflects that. The components work harder and wear accordingly.
Fitting New Pads onto Worn Discs Would Have Left the Car Noisy and the Braking Compromised
This is a situation we see regularly. A customer comes in thinking they just need pads, which is understandable because pads are the consumable part most people know about. But if you fit new pads onto a disc that has a pronounced lip, a few things happen. The new pad has a flat contact surface and the disc no longer does. That means you get uneven contact between the two, which leads to vibration through the pedal and persistent squeaking or grinding that does not go away with time. Beyond the noise, the braking performance is reduced because the pad is not making full, even contact with the disc surface. On a car like a 520d that weighs around 1,700 kilograms, you need the braking system working as it should. Reduced braking efficiency at motorway speeds or in an emergency stop is not something you want to discover at the wrong moment. We explained this to the customer clearly, showed them what we were looking at, and they made the sensible call to have the discs replaced at the same time. Doing it all in one visit also means the labour is not doubled up the way it would be if they had come back for the discs a few months later.
Both Front Discs and Pads Were Replaced and the Braking System Checked Throughout Before the Car Left
We fitted new discs and pads on both front corners. Using matched components means the contact surfaces bed in together properly over the first hundred miles or so of gentle use. We checked the callipers for free movement and inspected the rear brakes at the same time to make sure nothing else needed attention. The car left with a braking system that was back to where it should be, with even pedal feel and no noise. Jobs like this one are worth doing properly rather than in stages.
Brake wear is something we check on every vehicle that comes through our workshop in Walsall, whether it comes in for a service, an MOT, or a specific repair. If you are not sure about the condition of your brakes, there are a few things worth paying attention to on your own car. A squealing or squeaking noise when you brake, particularly when the brakes are cold, often means the pads are getting low. A grinding noise, where you can feel or hear metal on metal contact, means the pad material has gone completely and the metal backing plate is contacting the disc directly. At that point the disc is being scored with every stop and the repair cost goes up considerably. A vibration or pulsing through the brake pedal when you slow down usually points to a disc that has warped or worn unevenly. If your car is pulling to one side under braking, that can indicate a calliper that is not releasing or a pad that is wearing faster on one side than the other. None of these are things to leave. If you are based in or around Walsall and any of that sounds familiar, get in touch with us and we will take a look. You can book in at platinumvehicleservices.co.uk.
Vauxhall Corsa Air Conditioning Repair in Walsall
A Vauxhall Corsa came into us here at Platinum Vehicle Services with a complaint we hear fairly often this time of year. The air conditioning had stopped working. The driver had noticed it was blowing warm air regardless of the temperature setting, and had been putting up with it for a couple of weeks before deciding to get it looked at. We put it straight onto the ramp and started working through the AC system to find out exactly what was going on.
The AC System Had Lost Its Refrigerant Charge and the Compressor Was Not Engaging
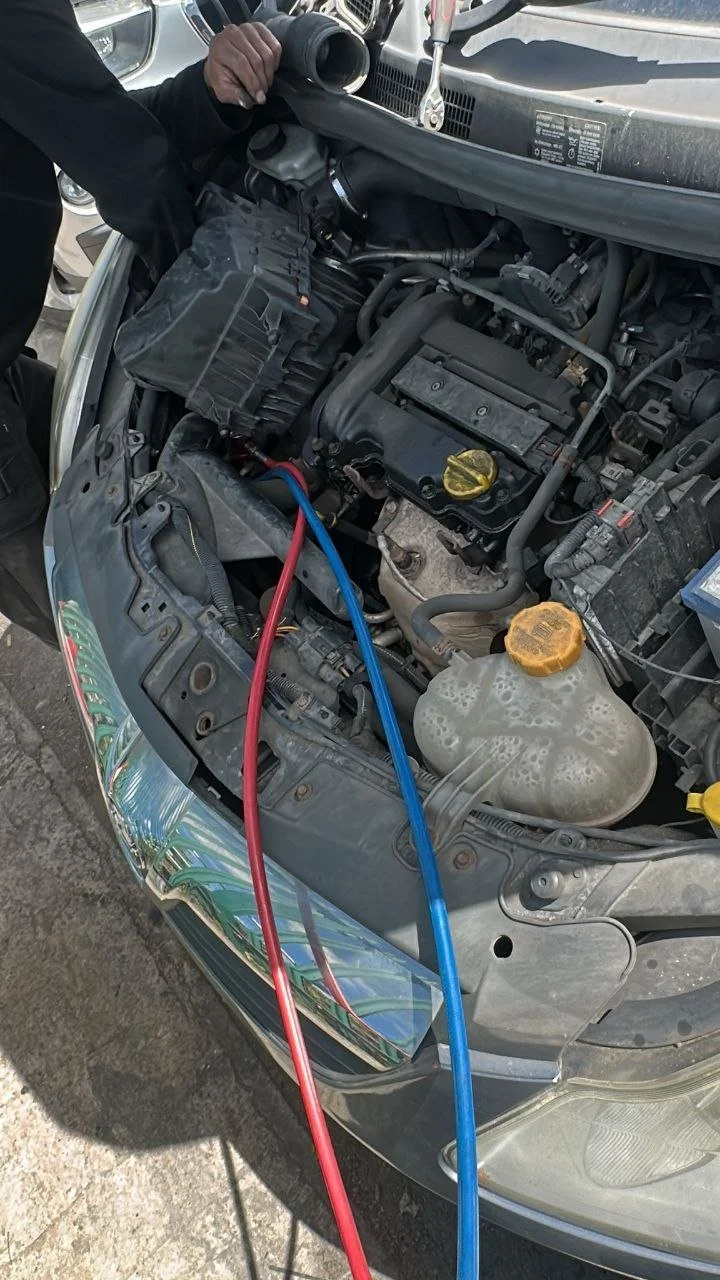
The first thing we check on any AC job is whether the system holds pressure. On this Corsa, when we connected our manifold gauge set, the low-side pressure was reading far lower than it should be. A correctly charged system on this vehicle should sit somewhere in the region of 25 to 35 PSI on the low side at idle with the AC running. This one was reading close to zero, which told us the refrigerant had leaked out almost entirely. With no refrigerant in the system, the pressure switch that protects the compressor from running dry had cut it out completely. That is why the compressor clutch was not engaging and why the car was only blowing warm air. We also carried out a UV dye check to trace where the refrigerant had escaped from, and found the source at one of the service port connections where the Schrader valve was no longer sealing properly.
Leaving an Empty AC System Running Can Damage the Compressor Beyond Repair
Some customers wonder whether an AC system that is just blowing warm air is really worth worrying about, particularly outside of summer. The honest answer is that leaving it can cost you significantly more money down the line. The compressor on a Vauxhall Corsa is lubricated by oil that circulates with the refrigerant. When the refrigerant is gone, that oil is not moving around the system. If the compressor were to run in that condition, whether because the low-pressure switch failed or someone tried to force the system on, you would be looking at internal compressor damage. A replacement compressor on a Corsa can cost anywhere from 200 to 400 pounds in parts alone before labour. Fixing a faulty Schrader valve and recharging the system is a fraction of that. There is also the matter of comfort and safety. In warm weather, a car without functioning air conditioning can become very uncomfortable very quickly, and in some situations reduced driver comfort does affect concentration on longer journeys.
We Replaced the Faulty Valve, Vacuumed the System Down, and Recharged It to the Correct Specification
Once we had identified the leak point, we replaced the Schrader valve at the service port to restore a proper seal. Before recharging, we connected a vacuum pump and pulled the system down to remove any moisture or air that had got in while the refrigerant was absent. Moisture inside an AC system is a problem because it can react with the refrigerant to form acids that corrode the internal components over time. We held the vacuum for long enough to be confident the system was clean and dry before we started the recharge. The refrigerant used on this Corsa is R134a, and we charged it to the manufacturer's specified weight for the system. Once charged, the compressor engaged immediately, the pressures settled correctly on both the high and low sides, and the air coming out of the vents dropped to the temperatures you would expect from a properly functioning system.
Air conditioning faults are something we deal with regularly at Platinum Vehicle Services in Walsall. Whether it is a slow refrigerant leak, a failed compressor, a blocked condenser, or a cabin filter so blocked that it restricts airflow through the system, the symptoms often look the same from the driver's seat. If your AC is blowing warm, taking longer than usual to cool the cabin, making an unusual noise when you turn it on, or if you can smell something musty when the blowers are running, those are all signs worth having looked at before the problem develops into something more expensive. We work on all makes and models, and we will always tell you what we have found and what your options are before carrying out any work. If your air conditioning is not performing the way it should, get in touch with us or book online at platinumvehicleservices.co.uk.
Mitsubishi AC Pressure Test Carried Out in Walsall
A white Mitsubishi came into us recently for an air conditioning check. The customer had noticed the system was not cooling as well as it should, and wanted to know whether it needed a recharge or whether there was something more going on. Before we put any refrigerant into a system, we always carry out a pressure test first. There is no point topping up a system that has a leak, because you will be back in a few weeks with the same problem and you will have paid twice.
The AC System Was Pressure Tested Using Specialist R1234yf Equipment Before Any Work Was Done
This Mitsubishi uses R1234yf refrigerant, which is the newer type of refrigerant now fitted to most cars built in the last several years. It is not the same as the older R134a refrigerant, and you cannot service an R1234yf system with older equipment. We use a dedicated AC service machine that is specifically designed for R1234yf. It has its own set of pressure gauges, a digital readout, and connects to the vehicle's high and low pressure sides via colour-coded hoses, blue for the low side and red for the high side. The machine draws the system down into a vacuum first, then monitors whether that vacuum holds over a set period of time. If the pressure drops during that hold period, it tells us there is a leak somewhere in the system. On this Mitsubishi, the pressure readings came back well within range and held steady. That told us the system was sealed correctly and had no leaks we needed to worry about.
A Leaking or Low AC System Does More Than Just Blow Warm Air
A lot of people think a failing air conditioning system is just an inconvenience, something to put up with until it gets really bad. But there are a few things worth understanding here. The refrigerant in the system does not just cool the air, it also carries the oil that lubricates the compressor. If the refrigerant level drops too low, the compressor starts running dry. Compressors are not cheap. A replacement AC compressor on a car like this can run into several hundred pounds, and that is before you factor in the labour to fit it and the cost of evacuating and recharging the system properly. Catching a low refrigerant situation early, before the compressor starts suffering, is the difference between a relatively modest service job and a significantly more expensive repair. Beyond cost, in warmer months your air conditioning also plays a role in keeping you alert and comfortable on longer drives. It is not just about luxury.
The System Checked Out and the Car Was Confirmed Ready for the Warmer Months
Because the pressure test showed no leaks and the system was holding correctly, this Mitsubishi did not need any remedial work beyond the diagnostic check itself. The readings were solid, the system integrity was confirmed, and the customer left knowing exactly where they stood with their air conditioning. That is what a proper pressure test is for. It gives you a clear answer either the system is sound, or it is not, and if it is not, you know before you have wasted money on a recharge that would just leak straight back out.
At Platinum Vehicle Services in Walsall, we carry out air conditioning checks, pressure tests, recharges, and repairs on a wide range of vehicles. If your AC is blowing air that feels less cold than it used to, or if it seems to take much longer than normal to cool the cabin down, those are signs worth getting looked at. The same applies if you can hear an unusual noise when the AC compressor kicks in, or if you notice the system cycling on and off more than it should. These are all early indicators that something may be developing. Bringing it in sooner rather than later usually keeps the cost down considerably. If you want your air conditioning checked or serviced ahead of the summer, get in touch with us or book in through our website at platinumvehicleservices.co.uk.
Toyota Alphard Air Conditioning Regas at Platinum Vehicle Services in Walsall
We had a Toyota Alphard come into the garage recently, a Japanese import hybrid, and the owner had one main complaint: the air conditioning was not keeping up. On a warm day it was blowing cool rather than cold, and at times barely making a difference to the cabin temperature at all. These vehicles are well-built and generally reliable, but the air conditioning system needs the same attention as any other car. Refrigerant does not last forever, and on a hybrid import like this one, there are a few things worth checking before you start the regas process.
The A/C System Was Low on R134a Refrigerant and No Longer Cooling Efficiently
The Alphard uses R134a refrigerant, which is the standard for vehicles of this age. Before connecting the machine, we checked the system pressure on both the high and low side. The readings confirmed what the customer already suspected: the refrigerant level was significantly low. On a correctly charged system you would expect to see the low side sitting somewhere around 25 to 35 psi at idle with the A/C running. This one was reading below that range, which tells you the system cannot build enough pressure to allow the compressor to do its job properly. We also checked visually around the compressor, the condenser, and the service ports for any obvious signs of a leak. The Alphard's hybrid system means there are high-voltage orange cables running through the engine bay, so working around this car requires care. You do not touch those components, and you plan your movements before you start. With the inspection done and no obvious leak points found, we moved forward with the recovery and recharge.
Leaving a Low Refrigerant System Running Can Damage the Compressor and Cost Far More to Repair
A lot of customers ask whether it is worth bothering with the air conditioning if they can manage without it. The honest answer is that running a low refrigerant system is not just uncomfortable, it is hard on the components. The compressor relies on the refrigerant to carry lubrication oil around the system. When the refrigerant level drops, so does the amount of oil circulating through the compressor. Run it like that long enough and you will wear the compressor internals prematurely. A regas on a car like this is a straightforward cost. A compressor replacement is a significantly bigger job, and on a hybrid import with a specialist setup, that cost rises further. Beyond the mechanical side, there is also a practical safety point: if you are driving in high temperatures and the cabin is not cooling properly, that affects driver comfort and concentration, particularly on longer journeys.
The System Was Fully Recovered, Vacuumed, and Recharged to the Correct Specification
We connected our professional R134a refrigerant recovery and recharge machine to the high and low side service ports using the red and blue hoses. The machine first recovers any remaining refrigerant from the system so nothing is vented to atmosphere. It then pulls the system into a deep vacuum, which serves two purposes: it removes any moisture that may have entered the system, and it confirms there are no leaks by holding the vacuum over a set period. Once that stage was complete and the vacuum held, we recharged the system with the manufacturer-specified amount of R134a. Every vehicle has a specific charge weight, usually displayed on a sticker in the engine bay or referenced in the vehicle data. Getting that figure right matters. Overfilling is just as problematic as underfilling, as it puts excessive pressure on the system and can cause the compressor to cut out. With the recharge complete, we ran the system and confirmed the vent temperatures had dropped to where they needed to be. The customer drove away with a fully functioning climate control system.
If your air conditioning has stopped keeping up, or if it is taking much longer than it used to cool the cabin down, that is usually the first sign the refrigerant level needs attention. Other things to watch for are a musty smell when you first switch the A/C on, which can point to a damp evaporator, or the system cycling on and off more than it should. These are signs worth acting on before they become more involved repairs. At Platinum Vehicle Services in Walsall we carry out air conditioning regases on all vehicle types, including hybrid and Japanese import vehicles. If you are not sure whether your car uses R134a or the newer R1234yf refrigerant, we can check that for you when you book in. Get in touch or book your appointment at platinumvehicleservices.co.uk.
BMW Air Conditioning Regas Service in Walsall
This black BMW came into us at Platinum Vehicle Services blowing hot air from the air conditioning. The owner had noticed it over a period of time, the air just was not getting cold anymore, and by the time it arrived with us it was putting out nothing useful at all on a warm day. That is a common pattern with air conditioning systems. They do not usually fail overnight. The refrigerant level drops gradually, performance gets worse, and then one day it simply stops working. We got it booked in, carried out a full inspection of the system, and then carried out a complete air conditioning regas service to bring it back to where it should be.
The System Had Lost Refrigerant and Was No Longer Able to Cool the Air
The first thing we do before any regas is put the system through a vacuum process. We connected our PRO series air conditioning service machine to the BMW using the blue and red hoses you can see in the video, one to the low pressure side and one to the high pressure side of the system. The machine pulled the system down to a vacuum of -0.95 bar and held it there for just over twenty minutes. The reason we do this is twofold. First, it removes any moisture that has found its way into the system. Moisture in an air conditioning circuit reacts with the refrigerant to form acids, and those acids will corrode the internal components over time, including the compressor, which is the most expensive part in the system. Second, holding a vacuum lets us see whether the system holds pressure. If the vacuum drops during that period, it tells us there is a leak somewhere before we put any refrigerant in. There is no point filling a leaking system. You would be wasting gas and the customer would be back within weeks with the same problem.
Once the vacuum held, we moved on to the oil and dye injection stage. The oil lubricates the compressor and the other moving parts within the circuit. Without it, the compressor runs dry and will eventually seize. The dye is a UV-reactive fluid that we inject so that if there is any slow leak present, it shows up clearly under a UV lamp during the flush test at the end of the job. This BMW uses R134a refrigerant, which is the standard refrigerant for vehicles of this age. There is a label under the bonnet, fitted by the manufacturer, which specifies R134a and gives the exact fill weight as 550 grams, with a tolerance of plus or minus 10 grams. We follow that specification precisely. Overfilling an air conditioning system causes excessive pressure and can damage the compressor. Underfilling it means it will not reach the correct operating temperature. Neither outcome is acceptable, so we charge to the manufacturer figure every time.
Leaving It Any Longer Would Have Risked Compressor Damage and a Much Larger Bill
When an air conditioning system runs low on refrigerant, the compressor is not just working less effectively, it is working under strain. The refrigerant in these systems also carries the lubrication oil around the circuit. When refrigerant levels are low, there is less oil circulating, and the compressor starts running with reduced lubrication. Over time, that causes wear on the internal components. A compressor on a BMW of this type can cost several hundred pounds to supply and fit, sometimes significantly more depending on the model. The regas itself is a fraction of that cost. So if your air conditioning is blowing warm or just not as cold as it used to be, getting it looked at sooner rather than later is always the more cost-effective decision. Waiting until it stops completely can mean the compressor has already been working dry for some time, and by then you may be looking at a more involved repair.
Full Regas Completed with 550 Grams of R134a, Oil and Dye Injected, and a Flush Test Carried Out
After the vacuum held and the oil and dye were injected, we recharged the system with 550 grams of R134a refrigerant to the manufacturer specification. Once the charge was complete, we carried out the flush test. This involves running the system and checking all the connection points and components under a UV lamp to confirm there are no leaks and that the dye we injected is circulating properly. The BMW passed the flush test without any issues. The air conditioning was blowing cold air correctly before the car left us, and the owner was satisfied with the result. The whole process, from vacuum through to final check, is done properly and in the right order every time. There are no shortcuts that are worth taking on a pressurised system like this.
Air conditioning is something a lot of drivers do not think about until it stops working, but it is worth having the system checked and regassed roughly every two years as a matter of course. The refrigerant does seep out slowly even on a system with no faults, and keeping the levels right protects the compressor and keeps everything working as it should. If your air conditioning is blowing warm air, taking longer than it used to get cold, or making an unusual noise when you switch it on, those are the signs to watch for. Any of those things is worth getting looked at before the problem develops further.
We carry out air conditioning regas and inspection services here in Walsall for all makes and models. If your car's air conditioning is not performing the way it should, get in touch and we will book it in. You can reach us and find out more about what we do at platinumvehicleservices.co.uk.
Ford Fiesta AC Regas in Walsall: Getting the Air Conditioning Cold Again Before Summer
A silver Ford Fiesta came into us here at Platinum Vehicle Services needing its air conditioning seen to. The owner had noticed the air coming through the vents was no longer as cold as it should be, which is a common complaint as we head into the warmer months. Before we did anything else, we connected our manifold gauge set to the system's service ports to see exactly what the refrigerant pressure was reading and work out what the system needed.
The AC System Was Low on Refrigerant and Not Producing Enough Cooling to Be Useful
When we hooked up the red and blue manifold gauge hoses to the high and low pressure service ports, the readings came back below where they should be. On a system like this, you want to see the low side sitting somewhere in the region of 25 to 35 PSI when the engine is running and the AC is active. What we were seeing told us the refrigerant level had dropped enough that the system was struggling to do its job properly. This is not unusual. R134a refrigerant, which is what this generation of Fiesta uses, can permeate slowly through seals and hoses over time even without a specific leak. A car that has not had its AC regassed in several years will often end up in exactly this situation. The compressor was cycling and the system was technically running, but without adequate refrigerant charge, the heat exchange process breaks down and you end up with air that is barely cooler than the ambient temperature outside. In warm weather that is not just uncomfortable, it makes the car genuinely difficult to drive for long periods, particularly in traffic.
Leaving the System Undercharged Puts Extra Strain on the Compressor and Can Lead to a Much Bigger Bill
It is worth understanding what happens when an AC system is run in a low refrigerant state for an extended period. The refrigerant in these systems does not just carry heat away from the cabin, it also carries the compressor oil that lubricates the compressor internals. When the refrigerant level is low, that oil circulation is reduced. Over time, running the compressor without adequate lubrication causes accelerated wear on the internal components. An AC compressor on a car like this can cost anywhere from 200 to over 400 pounds to replace, depending on the part and the labour involved in accessing it. A regas service costs a fraction of that. If you are noticing that your AC is blowing warm and you keep putting off booking it in, you are taking a risk with a component that is significantly more expensive to replace than it is to maintain properly.
The System Was Recharged to the Correct Pressure and the Air Was Tested Cold Before the Car Left
We recovered any remaining refrigerant from the system, drew it down into a vacuum to remove moisture and check for any significant leaks holding in the lines, and then recharged it with the correct amount of R134a refrigerant to bring the system back to the manufacturer's specified pressure range. Once recharged, we ran the system with the engine at idle and checked the vent temperature using a probe thermometer. The air coming through the vents was dropping down to the kind of temperatures you expect from a properly functioning system, well below 10 degrees Celsius at the vent with the blower on a mid setting. The car left with a fully functioning AC system ready to handle the summer heat.
If your car's air conditioning is blowing warm, or if it takes a long time to cool the cabin down even when you turn it up to full, that is usually the first sign that the refrigerant level needs attention. Other things to look out for are a musty smell when the AC is running, which can indicate moisture in the system, or the compressor clutch clicking on and off rapidly rather than engaging steadily. We carry out AC regas services here in Walsall as part of our wider vehicle maintenance offering, and we have the equipment to handle the full process properly, not just top up and hope for the best. If you want your air conditioning working as it should ahead of summer, get in touch with us at platinumvehicleservices.co.uk to book your car in.
BMW 3 Series Air Conditioning Regas in Walsall
A 2021 BMW 3 Series came into us recently for an air conditioning regas. The customer had noticed the air con was not performing the way it should, and after connecting the car to our diagnostic equipment it was clear why. The system was running almost completely dry of refrigerant.
The System Contained Only 30 Grams of Refrigerant Against a Required 550 Grams
When we pulled the car in and connected our specialist service machine, the reading came back at just 30 grams of R1234yf refrigerant remaining in the system. The label under the bonnet on this BMW states clearly that the system requires 550 grams, with a tolerance of plus or minus 15 grams. That means the car was running at roughly five percent of what it should have contained. At that level, the air conditioning compressor is working against nothing. The cold air the customer expected was simply not there because there was not enough refrigerant present to transfer heat away from the cabin air. It is worth noting that this vehicle uses the newer R1234yf refrigerant rather than the older R134a type. The two are not interchangeable and require separate, dedicated service equipment. Using the wrong machine or the wrong gas on a system like this causes damage and can be a safety risk, as R1234yf behaves differently under pressure and temperature. We have the correct equipment for both types here at the garage.
Leaving a System This Low Puts the Compressor at Risk and Makes the Problem More Expensive to Fix
An air conditioning compressor relies on the refrigerant itself to carry lubricating oil around the system. When the refrigerant level drops as low as 30 grams, the oil circulation is severely reduced. Run the system long enough in that state and the compressor begins to wear prematurely, and in some cases seizes. A compressor replacement on a BMW 3 Series is a significantly bigger job than a regas. You are looking at a component that can cost several hundred pounds on its own before labour is even factored in. The moisture side of it matters too. When refrigerant leaks out slowly over time, air and moisture can work their way into the system. Moisture in an air conditioning circuit reacts with the refrigerant to form acids, which attack seals, valves, and internal components. That is why the vacuum phase of a regas is not just a formality. It is the step that removes moisture and old gas before anything new goes in.
The System Was Vacuumed Down Thoroughly and Recharged to the Full 550 Gram Specification
Before we put any new refrigerant into the system, the service machine held the circuit under vacuum for a sustained period. This draws out residual moisture and any remaining old gas, leaving the system clean and dry before the recharge begins. Once we were satisfied with the vacuum hold, the machine filled the system back up with fresh R1234yf refrigerant to the manufacturer specification of 550 grams. After the recharge was complete, we confirmed the system was performing correctly and blowing cold as it should. The whole job was carried out using equipment designed specifically for R1234yf, which is the only correct way to service this type of system.
If Your Air Con Is Blowing Warm, Do Not Leave It Until the End of Summer
Air conditioning systems lose refrigerant gradually over time, even on well-maintained vehicles. Most manufacturers recommend a regas every two to three years as a routine service item, though many customers only notice a problem when the warm weather arrives and the air con stops keeping up. If you are based in or around Walsall and your air conditioning is blowing warm, taking longer than usual to cool the cabin, or has not been serviced in a few years, it is worth getting it checked before the problem develops further. The cost of a regas is a fraction of what a compressor replacement would set you back. At Platinum Vehicle Services we carry out air conditioning servicing on a wide range of vehicles using the correct equipment for both R134a and the newer R1234yf systems, so whatever you drive, we can handle it. Book in with us at platinumvehicleservices.co.uk
Peugeot 107 Air Conditioning Regas in Walsall
A red Peugeot 107 came into us here at Platinum Vehicle Services for an air conditioning regas. The owner had noticed the air con was no longer blowing cold air, which is one of the most common signs that the refrigerant level has dropped. This is a routine service job but one that needs to be done properly, with the right equipment and the right refrigerant, otherwise you can cause more problems than you solve.
The AC System Was Low on Refrigerant and Needed a Full Vacuum Test Before Anything Could Be Recharged
The first thing we do before putting any new refrigerant into a system is connect our specialist regas machine to the vehicle. On the Peugeot 107, the system uses R134a refrigerant, and our machine is purpose-built for exactly that. We connect two colour-coded hoses, red to the high-pressure port and blue to the low-pressure port, and then we run a vacuum test before any refrigerant is introduced. You can see on the machine's digital display that the vacuum stage is running with a countdown timer. What this stage actually does is pull all the air and moisture out of the system. Moisture is the enemy of an AC system. Even a small amount of water inside the pipework and components will mix with the refrigerant and form acids that corrode the system from the inside. The vacuum test also tells us whether the system holds a seal. If the pressure drops during the vacuum hold period, there is a leak somewhere and we know not to proceed until that is found and addressed. Putting refrigerant into a leaking system is a waste of money for you and it means the gas will escape into the atmosphere, which is also not ideal.
Leaving a Low AC System Running Without Attention Can Damage the Compressor and Turn a Simple Regas Into a Much Bigger Job
A lot of people assume that a warm blowing air con is just an inconvenience, particularly during cooler months. But there is more to it than comfort. When the refrigerant level drops too low, the compressor, which is the pump that drives the whole AC system, can run without adequate lubrication. The lubricating oil in an AC system is carried around with the refrigerant, so if the refrigerant level drops significantly, the oil does not circulate properly and the compressor starts to wear. A compressor on a car like the Peugeot 107 is not a cheap component to replace. You are looking at a considerably higher bill compared to a straightforward regas service. The longer it is left, the greater the risk to that compressor. If you notice your air con has stopped being as cold as it used to be, or it is taking much longer than usual to cool the cabin down, it is worth getting it looked at sooner rather than later.
The System Was Vacuumed, Tested for Leaks, and Recharged to the Correct Manufacturer Specification Using R134a Refrigerant
Once the vacuum test confirmed the system was holding a seal with no leaks present, we proceeded to recharge it with R134a refrigerant to the correct specification for this vehicle. The regas machine measures the amount of refrigerant introduced precisely, so we are not guessing or eyeballing it. The correct charge weight matters. Too little and the system will not perform properly. Too much and you risk over-pressurising the system, which can cause components to fail or safety valves to vent. When the recharge was complete, we checked the outlet temperature at the vents inside the cabin to confirm the system was performing correctly. The air con was blowing cold again as it should be.
If Your Car's Air Con Is Blowing Warm Air, This Is What You Should Look Out For and How We Can Help at Platinum Vehicle Services in Walsall
Air conditioning systems lose refrigerant gradually over time through very small amounts of natural permeation through seals and hoses. Most manufacturers suggest having the system regassed every two years or so, though many cars go longer than that before the driver notices a difference. The signs to watch for on your own car are simple. If the air coming from your vents is no longer cold even when the AC is switched on and set to its lowest temperature, that is the most obvious indicator. You might also notice that the system takes noticeably longer to cool the car down on a warm day compared to how it used to. A musty or unpleasant smell from the vents can indicate a separate but related issue with the cabin filter or the evaporator, which we can also check while the car is with us. If any of this sounds familiar, bring your car into Platinum Vehicle Services in Walsall and we will carry out a full AC inspection and regas using the correct refrigerant for your vehicle. You can book in at platinumvehicleservices.co.uk.
